Double-click the tool tip on your canvas to open the ellipse Options dialog box. Make your arrow and drag it to the symbols panel choose type graphic.

Create 3d Objects Obj Using Illustrator Photoshop For Adobe Dimension Product Mock Ups Youtube Photoshop Draw On Photos Adobe
You can create three-dimensional effects in Adobe Illustrator using a few simple shapes.

. Select Map Art choose your arrow symbol and the side surface. Draw a curved line like a squished S ie start with a point drag handle to the right click somewhere to the right and above of the first point. I created a doughnut from two ellipses one deleted from the other then took a quarter of that ellipse the elbow and extruded--it looks similar but its edges are straight.
Duplicate the line some space to the right and blend the 2 lines. Provide finishing touches to your design with appropriate Lighting and Shadow effects and then render your artwork with ease. Part of the series.
Maybe you are mapping to the wrong face. By Cheryl Graham Jan 10 2011. In todays Quick Tip you will learn how to map a simple Symbol to a 3D cylinder to make curly vector ribbons.
Select it and go to Effect 3D Revolve. Both will appear selected Click the Unite option to fuse the selected shapes. The number of times you do this step will determine the depth of the text object.
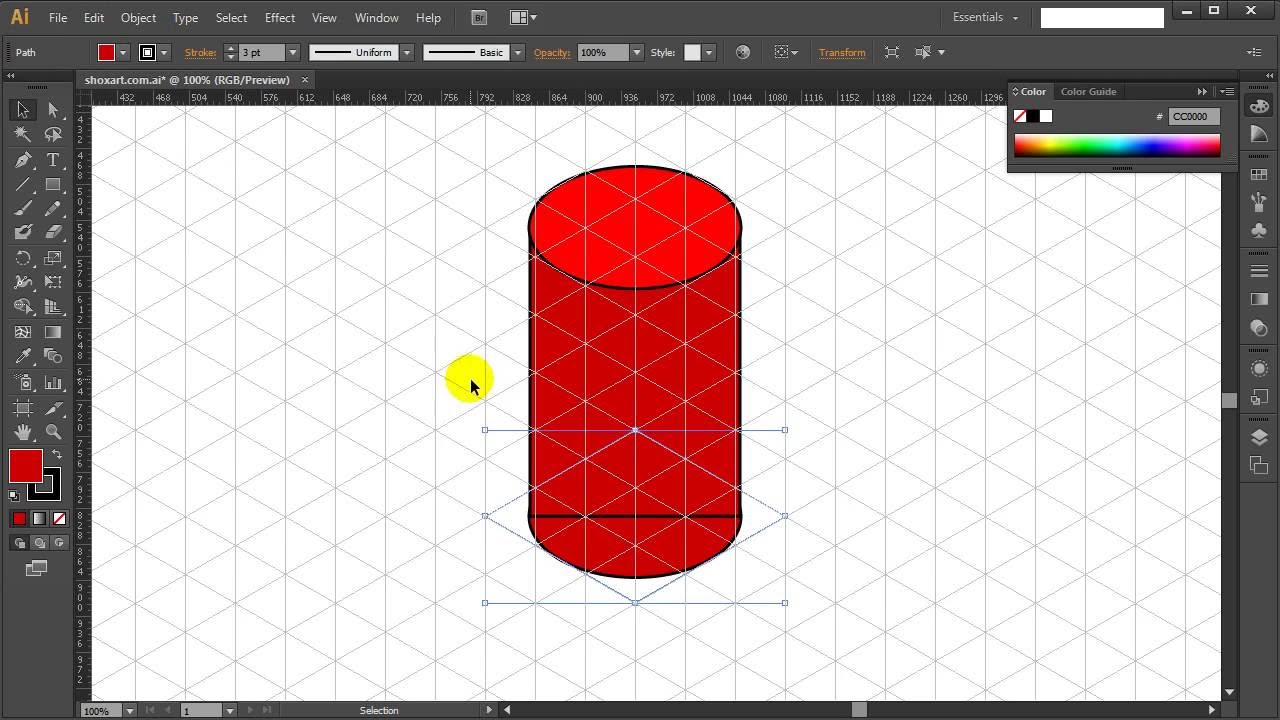
Show activity on this post. Select both of the shapes that will create the side of the cylinder. Select the Ellipse Tool L.
Step 2 Draw the Cylinder Inside the Prism. Tools Tips Vector Adobe Illustrator. An alternative for quickly producing this effect without the 3d tool.
Click here to view the full tutorial. In this Video I will Show You How To make a 3d bottle In illustrator Step By step in Very Easy way. It remains editable through the appearance panel and if you need to.
Draw a 3D cylinder with help. Get started by drawing your favorite art on paper trace it into Illustrator apply 3D effects like Extrude Rotation and Substance Materials. Create a vector art.
About Press Copyright Contact us Creators Advertise Developers Terms Privacy Policy Safety How YouTube works Test new features Press Copyright Contact us Creators. Make a rectangle to extrude into a cylinder. Click CTRLD repeatily to create the 3D effect.
Although it can be solid isnt necessary for a hollow pipe. Please watch till last of the video and please subscribe. Im trying to create a 3D extrude of an ABS pipe elbow like this.
Httpsbitly3uecTcg FREE Template Download. Do this for both the top and bottom plane. If that is the view of the cylinder that you actually want then you might be better off just creating a rectangle with the gradient in it and using a bulge effect on it.
On Map Art Surface select and the correct one. Thee back ellipse and the connecting shape to select both use the black arrow to click one then hold shift and click the other. By selecting the circle created just now go to Effects 3D and select Extrude Bevel.
We are going to map the 2 graphic symbols to this 3D cylinder. Inside the prism draw a line from two of the corner to the corner across from it making an X shape. The point at which the lines overlap will be the proper in perspective middle of the top and bottom plane of the shape.
FREE Graphic Design Workshop. Shift Alt drag it to make a copy or two. How to Draw a 3D Cylinder.
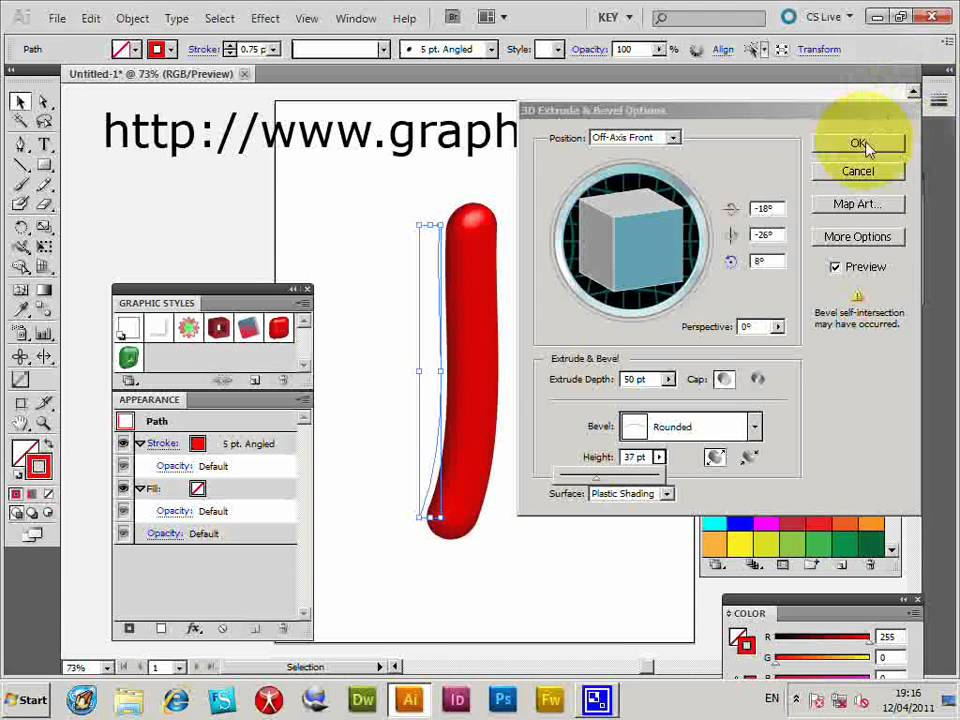
Fill in the options shown in picture below. Httpsbitly3rVm7c1 Graphic Design Course. In todays Quick Tip you will learn how to map a simple Symbol to a 3D cylinder to make curly vector ribbons.
After this click on the Map Art button to open up the Map Art window. The Illustrator Smart Guides and Pathfinder palette help you draw the object accurately. Rearrange the layers so the cap ellipse is above the cylinder side.
Default settings are good. The general shape of a cylinder is that of a pretty thin oval. Vector Tuts Quick Tip â Make 3D Ribbons.
Scale a one-dimensional object and then add a bottom sides and shading to give it a three-dimensional look. You would probably get a cleaner result without effects. Enter easy to remember numbers for Width and Height.
Select Edit Copy and then Edit Paste In Back. Duplicate the blend and flip it vertical. Place the arrow onto the white part size and position to fit.
With the text object in the back still selected press the up arrow key twice and the left arrow key twice. Vector Tuts Quick Tip â Make 3D Ribbons.
3d Modeling In Adobe Illustrator Teaching Graphic Design Graphic Design Lessons Illustrator Tutorials
Pin On Illustrator

Create 3d Objects In Adobe Illustrator Using Revolve Graphic Design Lessons Graphic Design Tips Graphic Design Fonts

How To Create Cylinder Infographics In Adobe Illustrator Adobe Illustrator Adobe Illustrator Tutorials Illustrator Tutorials

3d Objects Using Revolve Illustrator Tutorial Illustrator Tutorials Graphic Design Tutorials Photoshop Illustration Tutorial

Illustrator Tutorial Building A 3d Soda Can Lynda Com Illustrator Tutorials Tutorial Illustration

3d Effect Dialog Photoshop Illustrator Adobe Illustrator Tutorials Illustration
3d Shiny Illustrator Brush Strokes Tubes Tutorial Cc Cs6 Cs5 Cs4 Cs3 Etc Illustrator Brushes Illustration 3d Brush
0 comments
Post a Comment